Education*
Devops
Architecture
F/B End
B.Chain
Basic
Others
CLOSE
Search For:
Search
BY TAGS
linux
HTTP
golang
flutter
java
fintech
개발환경
kubernetes
network
Docker
devops
database
tutorial
cli
분산시스템
www
블록체인
AWS
system admin
bigdata
보안
금융
msa
mysql
redis
Linux command
dns
javascript
CICD
VPC
FILESYSTEM
S3
NGINX
TCP/IP
ZOOKEEPER
NOSQL
IAC
CLOUD
TERRAFORM
logging
IT용어
Kafka
docker-compose
Dart
Minikube 와 함께하는 Kubernetes Study 3 - Service
Recommanded
Free
YOUTUBE Lecture:
<% selectedImage[1] %>
yundream
2023-02-07
2023-03-03
3571
[Minikube 와 함께하는 Kubernetes 목차](https://www.joinc.co.kr/w/kubernetes_minikube_index) 이번 문서에서는 지난 [Minikube 와 함께하는 Kubernetes Study 2 - deployments](https://www.joinc.co.kr/w/man/12/kubernetes/deployment) 에서 다루었던 deployments에 이어서 **kubernetes service**를 다룰 것이다. 모든 내용은 로컬에서 kubenetes 구축 및 테스트를 도와주는 툴인 minikube 환경에서 진행한다. minikube 환경은 [Minikube 와 함께하는 Kubernetes Study 1 - Minikube 설치](https://www.joinc.co.kr/w/man/12/kubernetes/minikube) 을 참고해서 만들자. ## POD와 Service 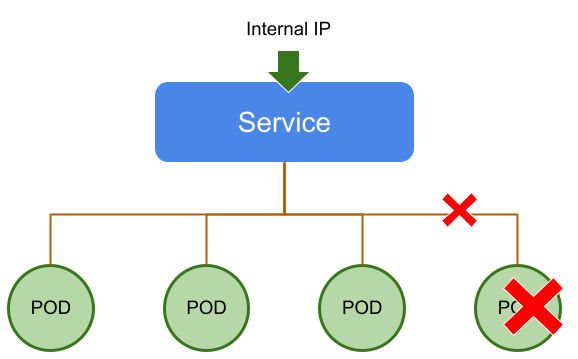 Kubernetes POD는 원리적으로 프로세스의 집합이다. 프로세서들이 라이프사이클을 가지는 것처럼 POD 들도 라이프사이클을 가진다. 만약 워커 노드가 죽으면, 워커노드위에 작동하는 POD들도 종료된다. 서버가 죽으면 서버 위에서 작동하던 프로세스의 생명이 어떻게 될지를 생각하면 된다. 쿠버네티스에서는 POD에 대한 복제본을 설정할 수 있기 때문에, 워커 노드의 문제로 POD가 내려갈 경우 다른 작동 중인 노드에서 POD를 만들어서 복제본의 총합을 유지한다. 쿠버네티스에서 서비스는 논리적인 POD 셋과 그 POD들에 접근할 수 있는 정책을 정의하는 개념이다. 이 개념을 이용해서 POD들을 느슨하게 결합되도록 할 수 있다. 서비스는 다른 쿠버네티스 객체(POD 등)과 마찬가지로 YAML 혹은 JSON을 이용해서 정의 할 수 있다. POD가 만들어지면 이들은 고유한 IP를 가지게 되는데, 이들은 클러스터 내부 IP로 외부에서 접근 할 수 없다. 쿠버네티스의 서비스 설정을 이용해서 외부에 IP를 노출 시켜줘야 한다. 쉽게 이해하기 위해서 쿠버네티스 네트워크 정책을 살펴보기로 했다. ## Kubernetes Deployments vs Service 쿠버네티스 Deployments의 목표는 단순하다. 그 목표는 "POD의 그룹을 관리하는 것"이다. 이들 POD에 대한 정보는 YAML 형식의 deployment 매니패스트(manifest)파일로 관리 한다. Deployments 컨트롤러(controller)는 복제 세트와 POD를 선언하며, 이를 업데이트하고 관리할 책임을 가진다. Deployments는 선언된 복제 세트와 POD의 정보를 읽어서 실제로 클러스터에 POD(애플리케이션)를 배포를 수행한다. 이제 클러스터에 전개된 POD를 외부에서 접근 할 수 있도록 노출(expose)해야 하는데, 이렇게 외부에 노출될 POD를 명확하게 정의하는 추상객체를 서비스라고 한다. 서비스를 통해서 비로서 외부에서 접근 할 수 있게 된다. 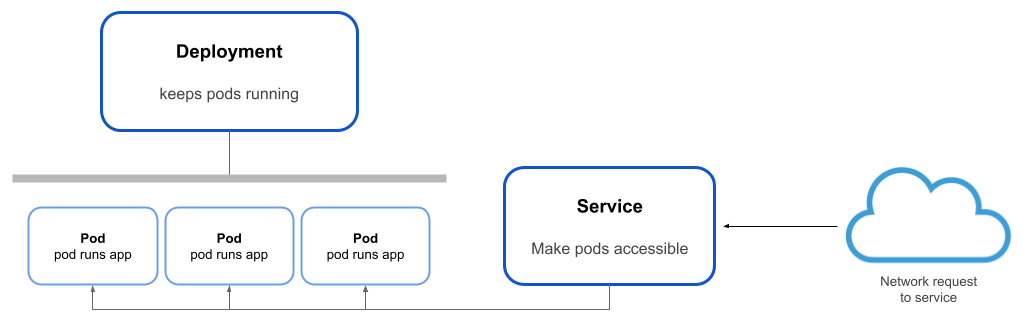 ## Service 전개 Google에서 제공하는 Service 예제를 이용해서 Service가 어떻게 실행되는지 알아본 다음 직접 Hello World Service를 전개해보기로 했다. [Minikube 와 함께하는 Kubernetes Study 1 - Minikube 설치](https://www.joinc.co.kr/w/man/12/kubernetes/minikube) 와 [Minikube 와 함께하는 Kubernetes Study 2 - deployments](https://www.joinc.co.kr/w/man/12/kubernetes/deployment) 의 복습 느낌이 될 것이다. 이번에 실행할 애플리케이션은 구글에서 제공하는 [gcr.io/google-samples/node-hello:1.0](http://gcr.io/google-samples/node-hello:1.0)](http://gcr.io/google-samples/node-hello:1.0%5D(http://gcr.io/google-samples/node-hello:1.0)) 애플리케이션이다. 먼저 아래와 같이 Deployment 파일을 만들었다. 파일의 이름은 "hello-application.yaml"이다. ```yaml apiVersion: apps/v1 kind: Deployment metadata: name: hello-world spec: selector: matchLabels: run: load-balancer-example replicas: 2 template: metadata: labels: run: load-balancer-example spec: containers: - name: hello-world image: [[gcr.io/google-samples/node-hello:1.0](http://gcr.io/google-samples/node-hello:1.0)](http://gcr.io/google-samples/node-hello:1.0%5D(http://gcr.io/google-samples/node-hello:1.0)) ports: - containerPort: 8080 protocol: TCP ``` [[gcr.io](http://gcr.io/)]([http://gcr.io/)는](http://gcr.io/)%EB%8A%94) Google Cloud의 Container Registry 이다. 여기에 테스트를 위한 도커이미지들을 제공하는데 그 중 **node-hello** 로 pod를 구성하기로 했다. ![[Screenshot_20230213_150029.png]] POD를 전개하고 ```shell $ kubectl apply -f ./hello-application.yaml deployment.apps/hello-world created ``` **describe** 명령으로 상세 정보를 확인해보자. ```shell $ kubectl describe deployments hello-world Name: hello-world Namespace: default CreationTimestamp: Mon, 13 Feb 2023 15:04:28 +0900 Labels: <none> Annotations: [[deployment.kubernetes.io/revision](http://deployment.kubernetes.io/revision)](http://deployment.kubernetes.io/revision%5D(http://deployment.kubernetes.io/revision)): 1 Selector: run=load-balancer-example Replicas: 2 desired | 2 updated | 2 total | 2 available | 0 unavailable StrategyType: RollingUpdate MinReadySeconds: 0 RollingUpdateStrategy: 25% max unavailable, 25% max surge Pod Template: Labels: run=load-balancer-example Containers: hello-world: Image: [[gcr.io/google-samples/node-hello:1.0](http://gcr.io/google-samples/node-hello:1.0)](http://gcr.io/google-samples/node-hello:1.0%5D(http://gcr.io/google-samples/node-hello:1.0)) Port: 8080/TCP Host Port: 0/TCP Environment: <none> Mounts: <none> Volumes: <none> Conditions: Type Status Reason ---- ------ ------ Available True MinimumReplicasAvailable Progressing True NewReplicaSetAvailable OldReplicaSets: <none> NewReplicaSet: hello-world-67dfcf556b (2/2 replicas created) Events: Type Reason Age From Message ---- ------ ---- ---- ------- Normal ScalingReplicaSet 4m15s deployment-controller Scaled up replica set hello-world-67dfcf556b to 2 ``` 이제 외부에서 접근 가능하도록 deployment를 expose 한다. ```shell kubectl expose deployments hello-minikube --type=LoadBalancer --port=8080 ``` LoadBalancer 타입으로 8080으로 Export 했다. 클라우드 서비스의 경우에 expost를 하면 퍼블릭 IP가 할당됮지만, 로컬에서 테스트하고 있기 때문에 Public IP를 할당 받을 수 없다. 그래서 **port-forward** 명령을 이용해서 7070포트로 접근할 수 있게 설정했다. ```shell kubectl port-forward service/hello-minikube 7080:8080 ``` curl로 테스트해보자. ```shell $ curl -XGET localhost:7080 -I HTTP/1.1 200 OK Server: nginx/1.10.0 Date: Mon, 13 Feb 2023 06:24:03 GMT Content-Type: text/plain Transfer-Encoding: chunked Connection: keep-alive ``` ## Hello World Service의 개발 이제 본격적으로 나만의 Hello World Service를 개발해 보자. 이 프로그램은 아래와 같이 개발할 것이다. 1. 이 애플리케이션은 Nginx와 Python Flask로 구성된다. 1. 클라이언트는 NginX를 통해서 API를 호출한다. 2. Python Flask 기반의 hello API 서버 : /hi/{name} 를 호출하면 "Hello World {name}!!"을 리턴한다. 프로그램의 이름은 hello-flask로 한다. 3. Dockerizing을 해서 로컬에 도커 저장소에 저장한다. 4. NginX와 hello-flask를 deploy 한다. 5. NginX를 expose 해서 외부에서 호출할 수 있게 한다. 6. 로컬에서 API를 테스트 한다. ### hello-flask application 개발 아래와 같은 python 코드를 만들었다. 파일의 이름은 hello.py 로 했다. ```python #!/usr/bin/env python # encoding: utf-8 import json from flask import Flask app = Flask(__name__) @app.route('/') def index(): return "Python Example Application" @app.route('/hello/<name>') def hello(name): return "Hello " + str(name) app.run(host='0.0.0.0') ``` 그리고 의존성 관리를 위해서 **requirements.txt** 파일을 만들었다. ```shell flask ``` Dockerfile은 아래와 같다. ```dockerfile FROM python:3.8-slim-buster WORKDIR /app COPY ./requirements.txt /app/requirements.txt RUN pip install -r requirements.txt COPY . /app ENTRYPOINT [ "python" ] CMD ["hello.py"] ``` 자 Dockerfile을 빌드해보자. ```shell $ docker build -t joinc/hello-app:latest -t joinc/hello-app:0.1 . ``` 아래와 같이 실행이 된다면 성공적으로 빌드를 한 것이다. ```shell $ docker run --name hello joinc/hello-app * Serving Flask app 'hello' * Debug mode: off WARNING: This is a development server. Do not use it in a production deployment. Use a production WSGI server instead. * Running on all addresses (0.0.0.0) * Running on [http://127.0.0.1:5000](http://127.0.0.1:5000/) * Running on [http://172.17.0.2:5000](http://172.17.0.2:5000/) ``` ### Deployment 앞서서 joinc/hello-world을 빌드했는데, 지금 상태에서 minikube 클러스터에 배포하면 실패한다. 왜냐하면 현 상태에서 빌드를 하면 로컬 도커 레지스트리에 이미지가 등록되는데 minikube는 자체 레지스트리를 사용하고 있기때문이다. 따라서 minikube 레지스트리에 이미지를 등록해야 한다. **minkube docker-env** 명령으로 minikube 도커 환경을 확인할 수 있다. ```shell $ minikube docker-env export DOCKER_TLS_VERIFY="1" export DOCKER_HOST="tcp://[192.168.49.2:2376](http://192.168.49.2:2376/)" export DOCKER_CERT_PATH="/home/yundream/.minikube/certs" export MINIKUBE_ACTIVE_DOCKERD="minikube" # To point your shell to minikube's docker-daemon, run: # eval $(minikube -p minikube docker-env) ``` 이제 eval 명령으로 minikube 도커 환경을 등록하자. ```shell $ eval $(minikube -p minikube docker-env) ``` 변경된 도커 레지시트리를 참조하는지 확인해 보자. 성공적으로 환경이 적용됐다면 대략 아래와 같이 kubenetes 이미지 목록이 출력될 것이다. ```shell $ docker images REPOSITORY TAG IMAGE ID CREATED SIZE [registry.k8s.io/kube-apiserver](http://registry.k8s.io/kube-apiserver) v1.26.1 deb04688c4a3 3 weeks ago 134MB [registry.k8s.io/kube-controller-manager](http://registry.k8s.io/kube-controller-manager) v1.26.1 e9c08e11b07f 3 weeks ago 124MB [registry.k8s.io/kube-scheduler](http://registry.k8s.io/kube-scheduler) v1.26.1 655493523f60 3 weeks ago 56.3MB [registry.k8s.io/kube-proxy](http://registry.k8s.io/kube-proxy) v1.26.1 46a6bb3c77ce 3 weeks ago 65.6MB [registry.k8s.io/etcd](http://registry.k8s.io/etcd) 3.5.6-0 fce326961ae2 2 months ago 299MB [registry.k8s.io/pause](http://registry.k8s.io/pause) 3.9 e6f181688397 4 months ago 744kB kubernetesui/dashboard <none> 07655ddf2eeb 5 months ago 246MB kubernetesui/metrics-scraper <none> 115053965e86 8 months ago 43.8MB [registry.k8s.io/coredns/coredns](http://registry.k8s.io/coredns/coredns) v1.9.3 5185b96f0bec 8 months ago 48.8MB ``` 이제 Dockerfile을 빌드하면 minikube 도커 레지스트리에 등록된다. ```shell $ docker build -t joinc/hello-app:latest -t joinc/hello-app:0.1 . ``` 테스트에 사용할 Deployment 매니패스트 파일을 준비했다. 파일이름은 "hello-world.yaml"이다. ```yaml apiVersion: apps/v1 kind: Deployment metadata: name: hello-world spec: selector: matchLabels: run: hello-world-app replicas: 2 template: metadata: labels: run: hello-world-app spec: containers: - name: hello-world image: joinc/hello-app imagePullPolicy: Never ports: - containerPort: 5000 protocol: TCP ``` hello-world를 deploy 해보자. ```shell $ kubectl get deployments hello-world NAME READY UP-TO-DATE AVAILABLE AGE hello-world 2/2 2 2 21s ``` ## Service ### Service Type  Kubernetes 애플리케이션을 외부에 노출하기 위해서는 Kubernetes service 개체를 만들어야 한다. 결국 Kubernetes service는 외부에 노출하기 위한 **네트워크 구조**를 만드는 건데, 이를 **Service Type** 이라고 하며 총 4가지의 Service Type이 있다. **ClusterIP**는 클러스터 내부에 새로운 IP를 할당하고 여러 개의 POD를 바라보는 로드밸런서 형태로 작동한다. 내부에서만 사용하는 IP인 만큼 kubernetes 클러스터 내에서의 통신및 연결을 관리하기 위해서 사용한다. 1. 내부통신 : 동일한 Kubernetes 클러스터 내의 다른 서비스 또는 POD 간의 통신에 사용 할 수 있다. 2. 로드밸런싱 : 서비스의 일부인 여러 POD에 트래픽을 분산하는데 사용 할 수 있다. 3. 서비스디스커버리(Service Discovery) : ClusterIP는 고정된 IP와 DNS 이름을 제공하기 때문에 이 정보를 이용해서 서비스간 연결을 할 수 있다. 4. 확장 : 로드밸런서처럼 사용 할 수 있기 때문에 IP 주소나 DNS 이름에 영향을 주지 않고 포드를 확장 혹은 축소 할 수 있다. **NodePort**는 클러스터의 각 노드에 있느 특정 포트를 이용해서 서비스를 노출하는 Service Type이다. 개발 또는 테스트를 위해서 외부에서 서비스를 쉽게 접근하기 위한 목적으로 주료 사용한다. **LoadBalancer** 클라우드 공급자의 로드 밸런서를 사용하여 서비스를 외부에 노출한다. **Ingress** 는 클러스터 외부에서 클러스터 내의 서비스로 HTTP 및 HTTPS 경로를 제공하기 위해서 사용한다. 복잡한 트래픽 라우팅이 가능하다는 점에서 AWS 등에서 제공하는 API Gateway나 Application LoadBalancer과 유사한 면이 있다. Ingress라는 익숙하지 않은 용어로 헷갈린다면 진보된 Application LoadBalancer 혹은 API Gateway라고 이해하면 된다. Ingress가 하는 일이 LoadBalancer와 유사하기 때문에, 서비스 목적에 따라서 다양한 종류의 LoadBalancer를 Ingress 컨트롤러(controller)로 사용할 수 있다. NginX, Istio, traefik, kong과 같은 오픈소스 LoadBalancer 뿐만 아니라 AWS를 사용하고 있을 경우 **Application LoadBalancer**를 Ingress 컨트롤러로도 사용 할 수 있다. ### LoadBalancer Type의 Service 만들기 이제 hello-world deployment를 expost 해서 외부에서 접근 할 수 있는 서비스로 만들어보자. ```shell kubectl expose deployment hello-world --type=LoadBalancer --name=hello-world-service ``` ```shell $ kubectl get service hello-service NAME TYPE CLUSTER-IP EXTERNAL-IP PORT(S) AGE hello-service LoadBalancer 10.101.85.154 <pending> 5000:30781/TCP 75s ``` service의 상세 정보를 확인해보자. ```shell $ kubectl describe service hello-world-service Name: hello-world-service Namespace: default Labels: <none> Annotations: <none> Selector: run=load-balancer-example Type: LoadBalancer IP Family Policy: SingleStack IP Families: IPv4 IP: 10.110.87.78 IPs: 10.110.87.78 Port: <unset> 5000/TCP TargetPort: 5000/TCP NodePort: <unset> 31974/TCP Endpoints: [10.244.0.20:5000](http://10.244.0.20:5000/),[10.244.0.21:5000](http://10.244.0.21:5000/) Session Affinity: None External Traffic Policy: Cluster Events: <none> ``` service가 성공적으로 전개됐다면, 로컬에서 테스트 할 수 있도록 **포트포워딩**을 한다. ```shell $ kubectl port-forward service/hello-service 7080:5000 Forwarding from [127.0.0.1:7080](http://127.0.0.1:7080/) -> 5000 Forwarding from [::1]:7080 -> 5000 ``` curl로 테스트해 보자. ```shell $ curl localhost:7080 Python Example Application $ curl localhost:7080/hello/yundream Hello yundream ``` 지금까지는 service를 kubectl 명령 파라메터로 만들었는데, 관리를 하기 위해서는 매니패스트 파일로 만들어야 할 것이다. 아래와 같이 service 매니패스트 파일을 만들었다. 파일이름은 hello-service.yaml 로 했다. ```yaml apiVersion: v1 kind: Service metadata: name: hello-world-service spec: selector: run: hello-world-app ports: - port: 5000 type: LoadBalancer ``` **spec.selector**는 service로 expose하기 위한 app(deployment)이름이다. kubectl apply 명령으로 서비스를 실행해보자. ```shell kubectl apply -f hello-service.yaml ``` ### NodePort Type의 Service 만들기 NodePort Type으로 Service를 만들어보자. deployment를 생성한다. ```shell $ kubectl apply -f ./hello-application.yaml ``` Service 매니패스트 파일은 아래와 같다. ```yaml apiVersion: v1 kind: Service metadata: name: hello-world-service spec: selector: run: hello-world-app ports: - port: 5000 type: NodePort ``` Service를 생성한다. ```shell $ kubectl apply -f ./hello-service.yaml ``` Service 가 만들어졌는지 확인하고 ```shell $ kubectl get service hello-world-service NAME TYPE CLUSTER-IP EXTERNAL-IP PORT(S) AGE hello-world-service NodePort 10.99.149.177 <none> 5000:30332/TCP 25m ``` Service URL로 테스트 한다. ```yaml $ minikube service --url hello-world-service http://192.168.49.2:30332 ``` 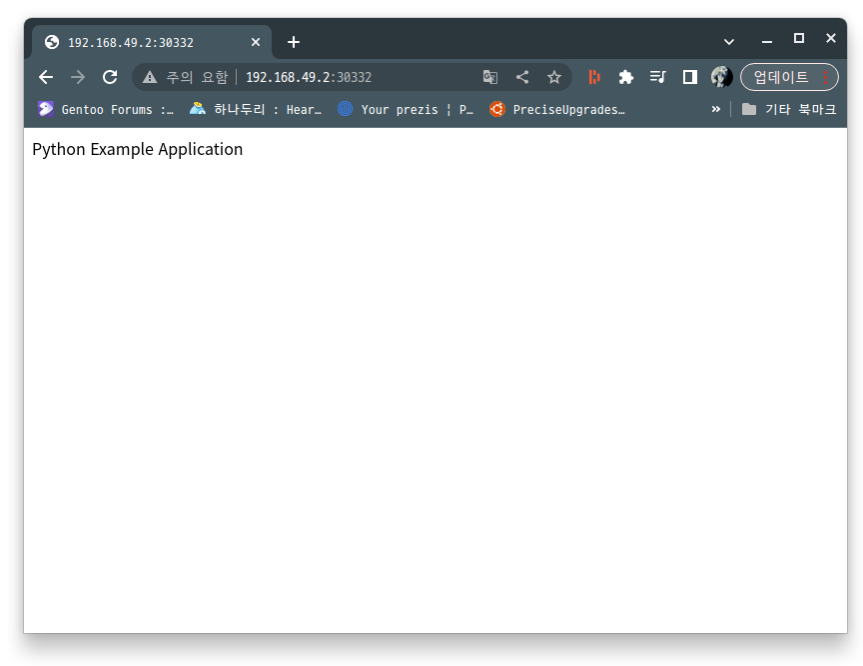 ## 정리 우리는 이 문서에서 minikube를 이용해서 kubernetes service를 만들었다. 다음 문서인 [Minikube 와 함께하는 Kubernetes Study 4 - Ingress](https://www.joinc.co.kr/w/kubernetes_ingress) 에서는 kubernetes ingress를 이용해서 kubernetes 클러스터에서 만들어진 서비스를 HTTP/HTTPS 로 노출하는 방법을 살펴보도록 하겠다. ## 참고 * [https://medium.com/avmconsulting-blog/service-types-in-kubernetes-24a1587677d6](https://medium.com/avmconsulting-blog/service-types-in-kubernetes-24a1587677d6) * [Connect a Frontend to a Backend]([https://kubernetes.io/docs/tasks/access-application-cluster/connecting-frontend-backend/](https://kubernetes.io/docs/tasks/access-application-cluster/connecting-frontend-backend/))
Recent Posts
Vertex Gemini 기반 AI 에이전트 개발 06. LLM Native Application 개발
최신 경량 LLM Gemma 3 테스트
MLOps with Joinc - Kubeflow 설치
Vertex Gemini 기반 AI 에이전트 개발 05. 첫 번째 LLM 애플리케이션 개발
LLama-3.2-Vision 테스트
Vertex Gemini 기반 AI 에이전트 개발 04. 프롬프트 엔지니어링
Vertex Gemini 기반 AI 에이전트 개발 03. Vertex AI Gemini 둘러보기
Vertex Gemini 기반 AI 에이전트 개발 02. 생성 AI에 대해서
Vertex Gemini 기반 AI 에이전트 개발 01. 소개
Vertex Gemini 기반 AI 에이전트 개발-소개
Archive Posts
Tags
cloud
docker
kubernetes
minikube와 함께하는 kubernetes study
Copyrights © -
Joinc
, All Rights Reserved.
Inherited From -
Yundream
Rebranded By -
Joonphil
Recent Posts
Archive Posts
Tags